Your Complete Guide

You've Got the Rock Stepper.
Now Let's Make It Work.

Everything you need to target your glutes, abs, quads, calves, and arms — with 30-day plans built specifically for women who are ready to stop guessing.

✦ For women who already own the Rock Stepper (and those considering it)
4 30-Day Plans
6 Muscle Groups
30 Days of Tips
100% At Home
Free 30-Day Program

Your Accountability Partner Awaits

Research is clear: you're dramatically more likely to reach your goals when you're not doing it alone. The Rock Stepper 30-Day Challenge gives you a daily workout tip, a check-in reminder, and a community of women on the same journey — delivered straight to your inbox.

📊 The science backs this up: A study by the American Society of Training and Development found that people with a specific accountability partner achieve their goals at a rate of 95% — compared to just 10% when acting on an idea alone. Having a commitment appointment increases success by 65%.

📊 And it compounds: Women who track their workouts and receive regular reminders are 3x more consistent at 30 days than those who rely on motivation alone. Motivation gets you started — systems keep you going.

Join the Free 30-Day
Rock Stepper Challenge

Daily tips + accountability check-ins sent to your inbox. Free. No spam. Cancel anytime.

  • Day-by-day workout guidance for your specific goal
  • Form reminders so you get results without injury
  • Weekly progress check-ins to keep you on track
  • Accessory tips to level up your sessions
  • A community of women on the same journey
🌸 Yes — I'm In! Start the Challenge

By signing up you agree to receive weekly Rock Stepper tips and workout reminders. Unsubscribe anytime.

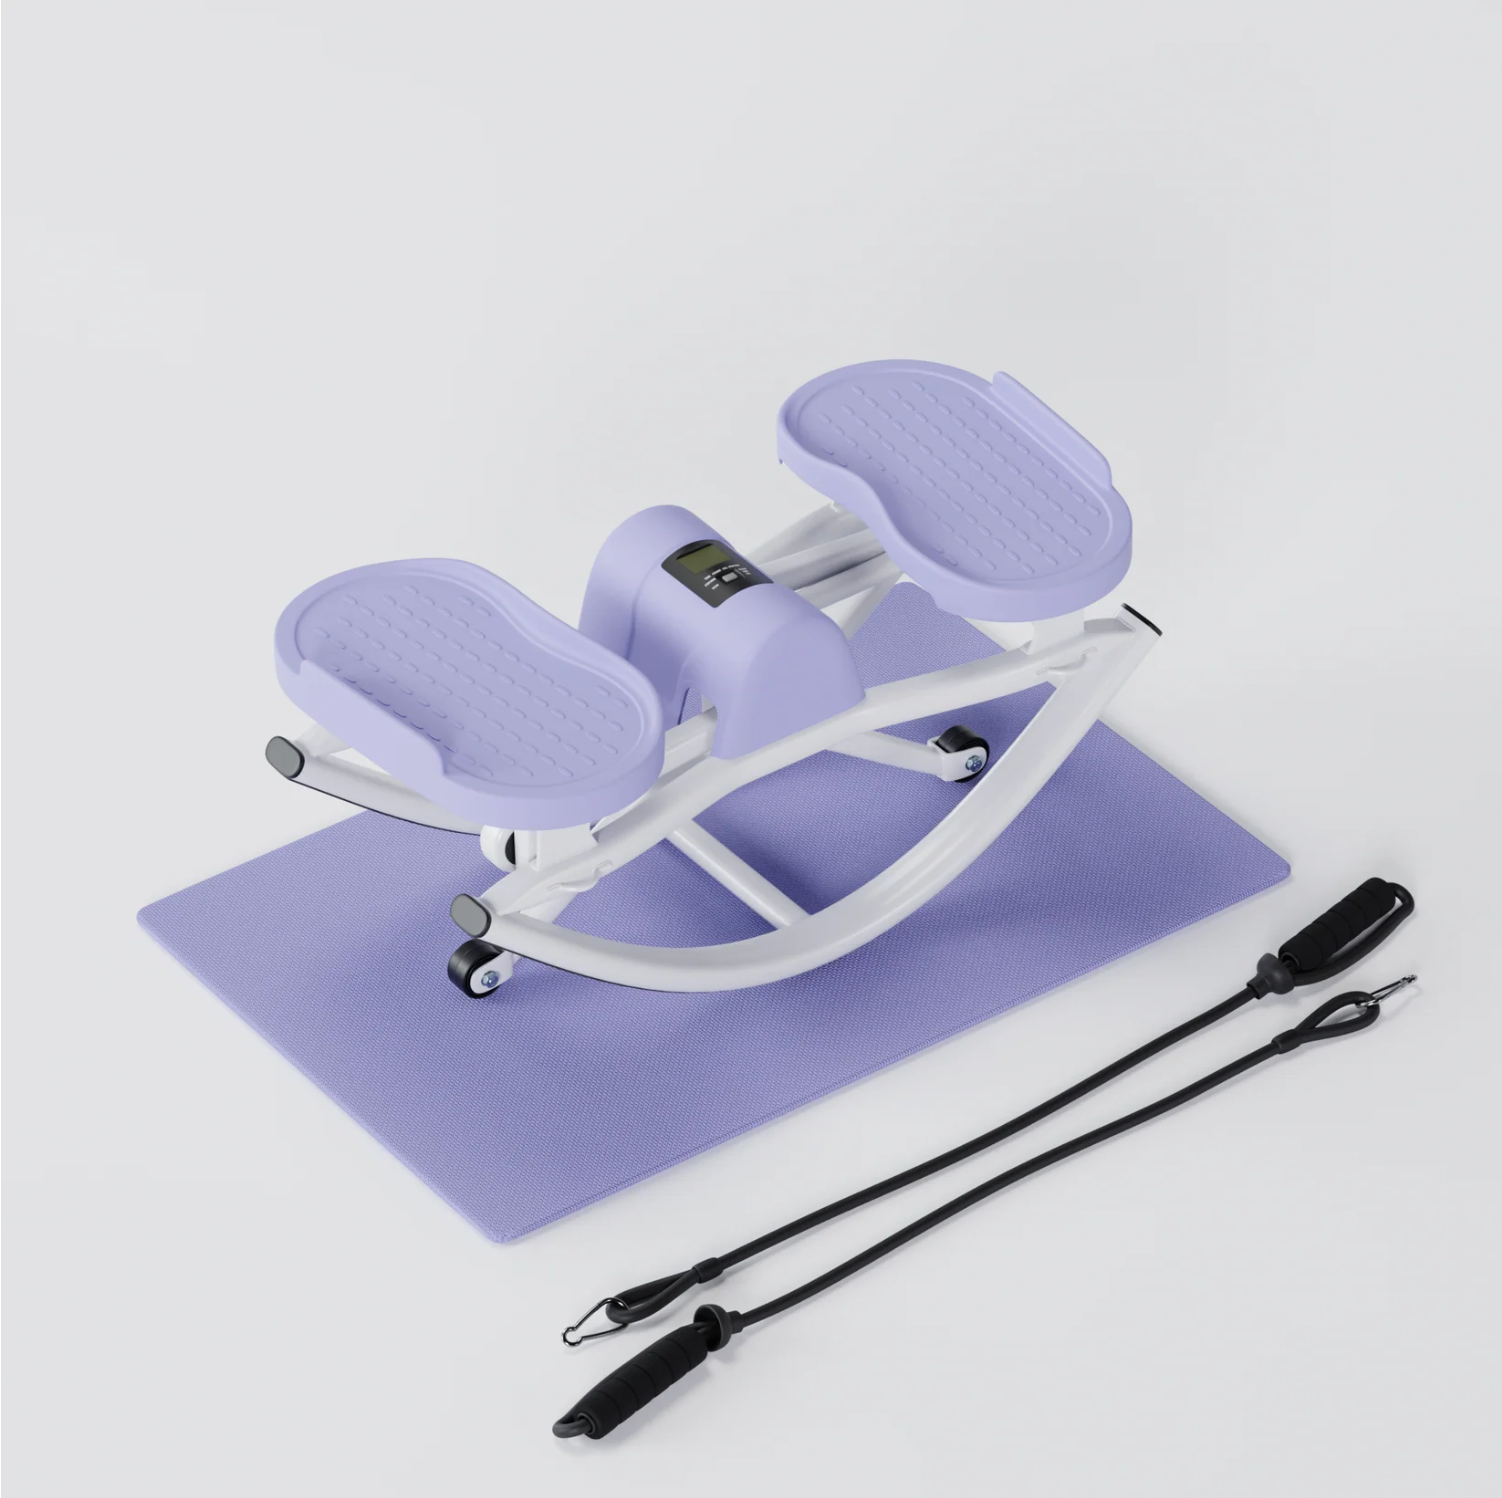
ProductThe Rock Stepper
BrandLHANEL F/T
Size20" × 11.2" × 9.4"
Machine weight12.57 lbs
Capacity350 lbs (159 kg)
TrackerSteps, Time, Cal, Rate
IncludesResistance Bands
Don't have one yet? Shop here →
Not Your Average Mini Stepper

What Makes the Rock Stepper Different

Most mini steppers move straight up and down — like a stair climber. The Rock Stepper does something fundamentally different. Its platform rocks side-to-side on dual roller wheels, tilting beneath your feet as you shift your weight.

That tilting motion is what makes this machine so interesting for body recomposition. Because you're constantly balancing on a moving surface, your core has to fire nonstop, your hip stabilizers wake up, and your glutes engage in ways a stationary machine simply can't replicate.

This guide will show you exactly how to take advantage of that. Whether you've been using it for a week or you've had it sitting in the corner for months — you're in the right place.

A note on this guide: This is an independent third-party guide, not produced by LHANEL F/T. All product specs and safety instructions are referenced from the official Rock Stepper instruction manual. Always consult your physician before starting a new exercise program.

The Rock Stepper Advantage

Why the Rocking Motion Changes Everything

Six reasons the Rock Stepper recruits more muscle — and burns more — than a standard mini stepper.

⚖️

Balance Demand

The rolling platform forces constant micro-adjustments, activating deep stabilizer muscles in your hips, ankles, and core with every single rep.

🍑

Gluteus Medius Activation

The lateral rocking motion targets your gluteus medius — the muscle that shapes the outer curve of your glutes — far more effectively than vertical stepping.

🔥

Core Always Engaged

You can't zone out on this machine. Your core engages from the first rep to the last — turning every cardio session into ab work simultaneously.

🦵

Full Lower Body Range

Adjust your foot position and lean angle to shift emphasis between quads, hamstrings, calves, and glutes — all from the same machine.

🏠

No Space Required

At just 20 inches long and under 13 lbs, it stores under a bed or sofa. No gym. No commute. No membership fee. Just results, on your schedule.

📊

Built-In Progress Tracker

The digital counter tracks your steps, time, stepping rate, and estimated calories — so you can set real goals and watch yourself hit them.

Muscle Targeting

How to Hit Every Muscle Group

Small adjustments in your form create dramatically different results. Here's exactly how to target each muscle group on the Rock Stepper.

Glutes — Maximus + Medius

How to Target Your Glutes

The Rock Stepper is uniquely designed for glute work — but only if your form is right. Most people leave glutes out of it without realizing it.

  • Lean slightly forward from the hips (not the waist). Think of a gentle bow, not a hunch. This shifts load to your posterior chain.
  • Drive through your heels, not your toes. This is the single most important cue. Heels = glutes. Toes = quads and calves.
  • Slow the tempo down — 2 seconds to rock each way. Faster feels like cardio but reduces glute time under tension.
  • Consciously squeeze your glutes at the top of each push. Don't just step — contract.
  • For a burnout finish: stay at mid-rock and do 20–30 small pulses without returning to full extension. You'll feel this immediately.
  • For the outer glutes (medius), let your hips follow the rocking motion slightly wider — don't resist it.
Calves — Gastrocnemius + Soleus

How to Target Your Calves

The rocking rhythm already loads the calves naturally. These tweaks maximize the burn.

  • Keep weight slightly forward over the ball of your foot as each pedal rises — this increases calf engagement on the lift.
  • As you rock down, let your heel lower slowly and deliberately — this adds a stretch to every rep.
  • Increase your tempo (steps per minute) to turn this into a cardio-calf combo that really burns.
  • After your stepper session, step off and do 20–25 standing calf raises to finish the muscle completely.
  • The soleus (deeper calf muscle) activates more when your knees are slightly bent — try a soft-knee stance for variety.
Quadriceps — Rectus Femoris + Vastus

How to Target Your Quads

Shift your weight slightly forward and you shift the work onto the front of your thighs.

  • Stand tall and upright — no forward lean. An upright posture loads your quads to control the descent of each rock.
  • Place weight toward the front of your arch (not toes, but forward of center).
  • Use a deeper bend in the knees as you rock — more range of motion means more quad work.
  • Add 10–15 bodyweight squats between stepper rounds to double the quad stimulus and build strength alongside cardio.
  • Mental cue: think about pushing the platform away from you rather than just stepping. This recruits the quads more intentionally.
Core — Rectus Abdominis + Obliques + Transverse

How to Target Your Abs and Core

Your core is working just by standing on this machine. Here's how to turn that passive activation into intentional training.

  • Actively brace your core throughout — imagine bracing for a light tap to the stomach. Don't suck in; press out and hold.
  • Keep your ribcage down and avoid arching your lower back. Flared ribs = disengaged core.
  • Add a gentle hip rotation with each rock to engage the obliques — let the hips follow naturally rather than staying rigid.
  • Remove your stability crutch: hold your arms out to your sides or overhead while stepping. This forces your core to do more of the stabilizing work.
  • Add a medicine ball held overhead while stepping — the raised center of gravity lights up your deep core (transverse abdominis) immediately.
Outer Thighs + Hip Abductors

How to Target Outer Thighs and Hips

The lateral rocking motion is uniquely suited for the muscles that most traditional cardio machines barely touch.

  • Allow your hips to shift naturally with the rock — don't fight to stay perfectly still. The movement is the point.
  • Think about pushing out through the outside edge of your foot as you rock down to each side.
  • A slightly wider stance on the platform opens the hip angle and increases abductor engagement.
  • Pair with resistance band lateral walks after your session to reinforce the outer hip work.
  • For inner thighs, bring your feet closer together to increase adductor demand on the stabilizing leg.
Arms + Upper Body — Included Bands

How to Target Arms and Upper Body

Your Rock Stepper comes with resistance bands. Here's how to put them to work while you step.

  • Tricep pushdowns: Step on the band center with both feet, grip the handles with elbows at your sides, extend fully downward and return.
  • Overhead tricep extension: Hold one handle overhead, elbow pointed up, bend and extend — targets the long head that creates the horseshoe shape.
  • Bicep curls while rocking: The platform instability makes these far harder than they look — you'll feel it in your core too.
  • Lateral raises: Arms out to the side while stepping — your shoulders get challenged from two directions simultaneously.
  • Do upper body band moves between stepper rounds as active rest — your heart rate stays elevated without the legs giving out first.
Form First

The 4 Golden Rules of Rock Stepper Form

Master these before you worry about duration or intensity. Great form builds the body you want. Poor form builds bad habits — and sometimes injuries.

1

Heels Down

Weight in your heels, not your toes. This is the most important cue on this machine. Heels activate glutes. Toes overload the calves and knees.

2

Hinge, Don't Hunch

A slight forward lean from the hips (not the waist) fires the posterior chain. Think of gently bowing at the hips — not curling your back forward.

3

Slow Over Fast

2 seconds each direction beats rapid stepping every time for muscle building. Speed is cardio. Slow and controlled is body recomposition.

4

Core Always Braced

Never rest your core during a session. Constant engagement protects your lower back, improves balance, and turns cardio time into ab time simultaneously.

Safety note from the official manual: Always use the Rock Stepper on carpet or a thick cushioned exercise mat — never on hardwood, tile, or concrete. The dual roller wheels need traction to function safely. When getting on, press one pedal fully to the floor before transferring your full weight. When getting off, press a pedal down first before lifting the other foot.

Level Up Your Session

Rock Stepper + Medicine Ball

Adding a medicine ball creates a full-body challenge that burns more, builds more core stability, and makes 15 minutes feel like a complete workout. Start with a 4–6 lb ball once your balance on the machine is solid.

🎯

Overhead Hold While Stepping

Hold a 4–8 lb ball directly overhead with both hands while rocking. The raised center of gravity forces your deep core to work nonstop. Great for core + shoulder stability together.

Intermediate
🔄

Side-to-Side Rotation

Hold the ball at chest. As you rock left, rotate the ball and your torso left. Rock right, rotate right. Your obliques fire on every rep — great for waist definition.

Intermediate
💪

Step Off → Squat to Press

30 seconds on the Rock Stepper, then step off and do 10 medicine ball squat-to-overhead presses. Return to the stepper. This superset combo is one of the most efficient home circuits available.

Advanced
🤗

Ball Hug — Beginner Friendly

Hold the ball to your chest like a hug. Slow, deliberate rocking. No rotation. Adds weight without disrupting balance — the safest way to introduce load.

Beginner Friendly
🌊

Figure-8 Swing

While rocking slowly, swing a light ball (4–6 lbs) in a figure-8 pattern between your legs. Engages core, shoulders, and coordination. Only attempt once your machine balance is fully confident.

Advanced — balance required
🔁

Chest Press Pulse

Hold the ball at chest. Every 4th rock, push the ball forward and pull it back (a standing chest press). The platform instability makes this a serious core + chest challenge.

Advanced
💡

Choosing your ball: Start with 4–6 lbs for balance moves. Use 8–10 lbs for strength combinations. A rubber, non-slip surface ball is easiest to grip while your feet are moving. Shop medicine balls on Amazon →

Structured Programs

30-Day Challenge

Four focused programs targeting different goals — all built around the Rock Stepper as the anchor movement, with add-on exercises that build real muscle. Pick the one that matches your priority, or cycle through all four.

🍑 Glute Plan philosophy: The Rock Stepper activates glutes through its unique rocking motion. But activation without progressive load doesn't build visible muscle. This plan pairs stepper cardio (which fires glute fibers) with compound strength add-ons (which give those fibers a reason to grow). Heels down. Squeeze at the top. Every. Single. Rep.

Week 1
Foundation — Learn the Movement
10 min Rock Stepper + basic glute activation circuit
Mon
1
10 min Rock Stepper (heel focus) + 15 glute bridges
Tue
2
Rest or light walk
Wed
3
10 min Rock Stepper + 12 bodyweight squats × 2
Thu
4
Rest
Fri
5
10 min + 10 reverse lunges each leg
Sat
6
Rest or stretch
Sun
7
Rest + foam roll
Week 2
Activation — Build the Mind-Muscle Connection
15 min Rock Stepper + compound glute moves
Mon
8
15 min Rock Stepper + 20 glute bridges + 12 squats
Tue
9
Rest
Wed
10
15 min pulse-hold focus + 12 reverse lunges each leg
Thu
11
Strength only: 3×15 glute bridges + 3×12 squats
Fri
12
Rest
Sat
13
15 min Rock Stepper + hip circle stretches
Sun
14
Rest + foam roll glutes
Week 3
Intensity — Add Load
15–20 min Rock Stepper + weighted strength moves
Mon
15
20 min Rock Stepper (slow tempo) + 15 weighted glute bridges
Tue
16
Rest
Wed
17
20 min Rock Stepper + 3×15 squat pulses
Thu
18
Strength: 3×15 KB deadlifts + 3×12 weighted lunges
Fri
19
Rest
Sat
20
20 min + burnout: 30 glute bridges + 20 squat pulses
Sun
21
Rest + mobility
Week 4
Peak — Full Glute Recomposition Week
20 min Rock Stepper + full lower body circuit
Mon
22
20 min + 3 rounds: 15 KB swings, 12 squats, 10 lunges
Tue
23
Strength: heavy glute bridges + single-leg variations
Wed
24
Rest or yoga
Thu
25
20 min + pulse holds + 3×20 glute bridges
Fri
26
Full circuit × 4 rounds — the complete glute burnout
Sat
27
Rest + stretch
Sun
28
Final day: 25 min continuous + take your 30-day photo
🍑

Important: The Rock Stepper activates your glutes through cardio movement. Visible glute growth requires progressive resistance training too — heavier glute bridges, squats, kettlebell deadlifts. Think of the stepper as your activation + cardio layer, and the strength moves as the growth stimulus. Both are essential. Join the challenge to get daily form reminders and progressions.

🔥 Abs Plan philosophy: The Rock Stepper fires your deep core (transverse abdominis) through balance demands every session. Stack that with direct ab work and you'll build real definition. Remember: visible abs also require managing overall body composition through consistent movement and balanced nutrition — the stepper does both.

Week 1
Core Awareness — Activate the Deep Core
Learn to brace + foundational ab moves
Mon
1
10 min Rock Stepper (core braced) + 3×30s plank
Tue
2
Rest
Wed
3
10 min Rock Stepper + 3×15 dead bugs
Thu
4
Rest
Fri
5
10 min Rock Stepper + 2×20 heel taps + 3×30s plank
Sat
6
Rest
Sun
7
Rest + stretch
Weeks 2–4
Progressive Build — Rotation, Load, Integration
15–20 min Rock Stepper + evolving core circuit
Wk 2
8–14
15 min (hip rotations) + bicycle crunches + side plank holds
Wk 3
15–21
20 min (ball overhead) + medicine ball side-to-side + weighted sit-ups
Wk 4
22–28
20 min (arms overhead) + 4-move core circuit × 4 rounds
Rest
2 rest days minimum each week
🔥

Core tip: Core muscles recover faster than large muscle groups — 48 hours between sessions is enough. But keep bracing on the Rock Stepper every session, regardless of your plan day. Think of the stepper as daily core maintenance, and the circuit days as the growth stimulus.

🦵 Quads Plan philosophy: A more upright stance and forward weight distribution on the Rock Stepper shifts the demand onto your quadriceps. Stack this with controlled squat variations to progressively build the front of your legs over 30 days.

Week 1
Orientation — Quad Form on the Stepper
Learn the upright stance + foundational quad moves
Mon
1
10 min upright Rock Stepper + 15 bodyweight squats × 2
Tue
2
Rest
Wed
3
10 min + 12 forward lunges each leg
Thu
4
Rest
Fri
5
10 min + 20 squat pulses + 30s wall sit
Sat
6
Rest
Sun
7
Rest + quad stretch
Weeks 2–4
Progressive Overload — Add Weight Each Week
15–20 min Rock Stepper + progressively heavier quad circuit
Wk 2
8–14
15 min + 3×15 goblet squats + 3×12 forward step-ups
Wk 3
15–21
20 min + 3×12 KB squats + wall sits 45s × 3
Wk 4
22–28
20 min + 4 rounds: KB squats, lunges, squat jumps
Rest
2 rest days per week minimum
🦵

Quad cue on the Rock Stepper: Stand tall, weight slightly forward of center, and mentally "push the platform away from you" with each step. This activates quads differently from the heel-drive cue used for glutes. Add a kettlebell goblet squat hold for progressive resistance as the weeks progress. Shop kettlebells →

💪 Triceps + Arms Plan: Your Rock Stepper comes with resistance bands. This plan uses those bands to sculpt the back of your arms while the stepper handles cardio and calorie burn. Three band sessions per week, stacked right after your stepper time — your heart rate stays elevated and your arms get a proper training stimulus.

Week 1
Foundation — Learn the Three Core Moves
Master the band exercises before adding volume
Mon
1
10 min stepper → 3×15 overhead tricep extension with band
Tue
2
Rest
Wed
3
10 min stepper → 3×15 band pushdowns (step on band)
Thu
4
Rest
Fri
5
10 min stepper → 3×12 tricep kickbacks with band
Sat
6
Rest
Sun
7
Rest
Weeks 2–4
Superset Protocol — Increasing Volume
Combine all three moves into progressively harder circuits
Wk 2
8–14
15 min stepper → superset: overhead extension + pushdown × 3 rounds
Wk 3
15–21
15 min stepper → tri-set: all 3 exercises back-to-back × 3 rounds
Wk 4
22–28
20 min stepper → 4 rounds full tricep circuit + burnout finisher
Rest
2 rest days per week
💪

Key tricep tip: The overhead tricep extension targets the long head — the largest portion of the tricep and the one that creates that toned, defined look on the back of the arm. Prioritize this move. Ensure full extension at the top and keep your elbows close to your head throughout. This is the move that makes the visual difference.
Build Your Setup

Accessories That Actually Make a Difference

The Rock Stepper is the anchor. These additions make every session more effective, safer, and easier to stay consistent with.

🧘

Thick Exercise Mat

The manual specifically recommends carpet or cushioned flooring. A high-density 6mm+ mat prevents slipping on hard floors, protects the roller wheels, and cushions the floor work you do beside the stepper.

✔ Recommended in the official safety guide
Shop Exercise Mats →
🏋️

Kettlebells

The single best add-on for the glute and quad plans. Kettlebell swings, goblet squats, and deadlifts provide the strength stimulus the stepper activates. Start with 15–25 lbs depending on your current fitness.

✔ Essential for the glute and quad plans
Shop Kettlebells →
🏐

Medicine Ball (4–8 lbs)

Unlocks the full medicine ball section of this guide — overhead holds, rotational passes, squat presses. Choose a rubber, non-slip surface for easier gripping while your feet are moving.

✔ Required for the medicine ball workout section
Shop Medicine Balls →
💧

Water Bottle with Time Markers

Dehydration reduces workout performance by up to 10–20%. A marked 32 oz bottle with hourly goals keeps you on track. Aim to finish one full bottle per session.

✔ Easy performance upgrade
Shop Water Bottles →
🦵

Loop Resistance Bands

The Rock Stepper includes pull-handle bands, but loop bands are different — and essential for outer glute work like banded squats, clamshells, and lateral walks. Get a set of 3 resistance levels.

✔ Great pair for glute + quad plans
Shop Loop Bands →
🧦

Grippy Non-Slip Socks

The manual warns against slippery socks. Barre-style grippy socks give you safe traction on the textured pedals without needing full shoes — ideal for at-home sessions. A small investment with a big safety payoff.

✔ Safety essential — per manufacturer guidelines
Shop Grippy Socks →
🌀

Foam Roller

Recovery is where results are built. Rolling your glutes, quads, IT band, and calves after each session reduces next-day soreness and improves the flexibility that makes your form better. Non-negotiable if you're running the 30-day plans.

✔ Speeds recovery between sessions
Shop Foam Rollers →
🎯

Adjustable Ankle Weights (1–3 lbs)

Strap on 1–2 lb ankle weights before stepping to dramatically increase the glute and quad demand without changing anything else. A low-cost way to add progressive overload starting in Week 2 or 3 of your plan.

✔ Easy progressive overload for stepper sessions
Shop Ankle Weights →
🎵

Wireless Earbuds

Music tempo directly influences workout intensity — research shows people push harder and enjoy exercise more with music. No cords while stepping. Look for a 120–140 BPM playlist for stepper sessions.

✔ Proven consistency booster
Shop Earbuds →
Free 30-Day Challenge

Ready to Stop Going It Alone?

Women who commit to an accountability challenge complete their fitness goals at nearly 3× the rate of those who go solo. Join hundreds of women rocking their way to real results — one day at a time.

Daily workout tip in your inbox
Weekly check-in email
Printable progress tracker
100% free, no spam
🌸 Join the Free 30-Day Challenge →

Unsubscribe anytime. We'll never share your email.

Questions Answered

FAQ

A standard mini stepper moves straight up and down in a stair-climbing motion. The Rock Stepper's platform rocks side-to-side on dual roller wheels, creating a tilting movement that engages the hip stabilizers, outer glutes (gluteus medius), and deep core in ways a stationary stepper simply cannot. This is the key distinction — and the reason the muscle targeting approach in this guide differs from standard stepper workouts.

The official manual recommends beginners start with 5 minutes every other day, building to 10 minutes. Active users can begin at 15 minutes per day. The 30-day plans in this guide progress from 10 to 20+ minutes over the month. Always include at least 2 full rest days per week — your body rebuilds during recovery, not during the session.

The key is heel pressure. If you're feeling it mostly in your calves, shift your weight back onto your heels, lean very slightly forward from the hips, and consciously squeeze your glutes at the top of each rock. Then slow your tempo — 2 full seconds each direction. You should feel a burning sensation in your glutes within 30–60 seconds. If not, slow down further and focus on driving through the heel with intent.

This is a common beginner experience. Usually it's caused by bending the knees too deeply while also resisting the rocking motion instead of flowing with it. Try: keeping a softer, less deep bend in the knees; allowing the rocking motion to happen naturally; engaging your thighs and core more actively. If the discomfort continues after adjusting your form, stop and consult a physician before continuing — especially if you have any history of knee or joint issues.

The manufacturer's manual advises against daily use seven days a week. If you prefer daily activity, include at least 2 full rest days within every 7-day period. Your muscles and connective tissue need recovery time to adapt, grow stronger, and reduce injury risk. On rest days, light walking or gentle stretching is a great complement to your stepper sessions.

Always use the Rock Stepper on carpet or a thick cushioned exercise mat. The official manual explicitly warns against using it on hard floors (wood, tile, concrete) — the roller wheels require traction to function safely. Using it on hard floors can cause the unit to slip and may also damage both the wheels and the floor surface.

Yes! Use your browser's built-in Print function (File → Print, or Ctrl+P / Cmd+P) and choose "Save as PDF" as the destination. This page includes print-optimized styling that removes navigation and button elements, keeping only the content you need. The result is a clean, readable PDF you can save, print, or keep on your phone.

The LHANEL F/T Rock Stepper is available through the link below. Note: this is an affiliate link, meaning we earn a small commission at no cost to you if you purchase through it. We only reference products we have directly reviewed and believe in. If you already own the Rock Stepper — welcome! This guide was written for you.

Don't have the Rock Stepper yet? It's where this whole guide begins.

View the Rock Stepper by LHANEL F/T →